How to test if a capacitor is bad

by Suntop
2025-09-02
Capacitors are vital in electronic devices, storing and releasing electrical energy as needed. They ensure smooth operation and stability in circuits. However, a faulty capacitor can lead to device failure or erratic behavior. Identifying a bad capacitor is crucial for maintaining electronic equipment.
Testing capacitors can seem daunting, but it’s manageable with the right tools and knowledge. An analog multimeter or ohmmeter can help determine a capacitor’s health. Before testing, ensure the capacitor is fully discharged to prevent electric shock.
This guide will walk you through the process of testing capacitors. You’ll learn how to use different tools and interpret results. Understanding these steps will help you troubleshoot and repair electronic devices effectively.
Understanding Capacitors: What They Are and Why They Matter
Capacitors are key components in electronics. They store electric charge and release it when necessary. This helps in smoothing out voltage fluctuations and power spikes.
These components are found in many devices, from small gadgets to large appliances. Understanding their role helps to appreciate their significance in modern technology.
Here’s a brief overview of capacitor functions:
- Store electrical energy
- Filter out noise in circuits
- Stabilize voltage supply
Capacitors also play a role in signal processing. They affect the frequency response of circuits, making them invaluable in audio and communication devices. Their function and longevity depend on various factors like temperature and usage frequency. Thus, knowing how to test them ensures reliability and safety in electronic circuits.
Common Signs of a Bad Capacitor
Identifying a bad capacitor can prevent further damage to electronic devices. Faulty capacitors often show visible and operational symptoms.
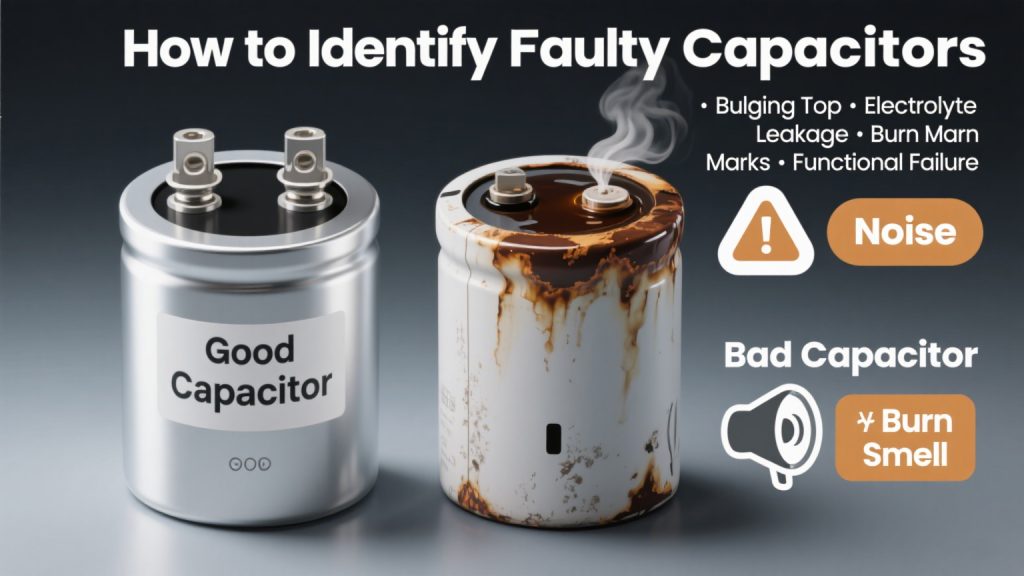
Look for physical signs first. A bulging or leaking capacitor is often defective. These signs are easy to spot during a visual inspection.
Other symptoms may be less obvious. Devices may start malfunctioning or produce unusual sounds. A burnt or unusual smell can also be a clue.
Here are common signs of a bad capacitor:
- Bulging or swelling
- Leaking fluid
- Burnt or strange smells
- Device malfunctions or noise
Detecting these early signs helps prevent major failures. If you notice any of these indicators, testing the capacitor immediately is essential. Quick action can save the device and ensure its longevity.
Safety First: Precautions Before Testing a Capacitor
Testing capacitors requires attention to safety. Capacitors store electrical energy and can discharge unexpectedly.
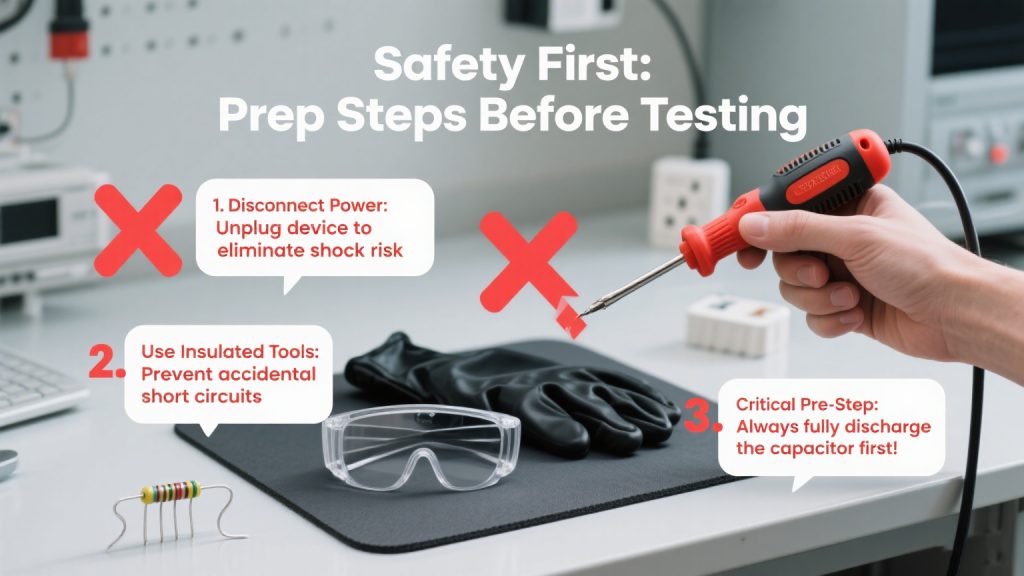
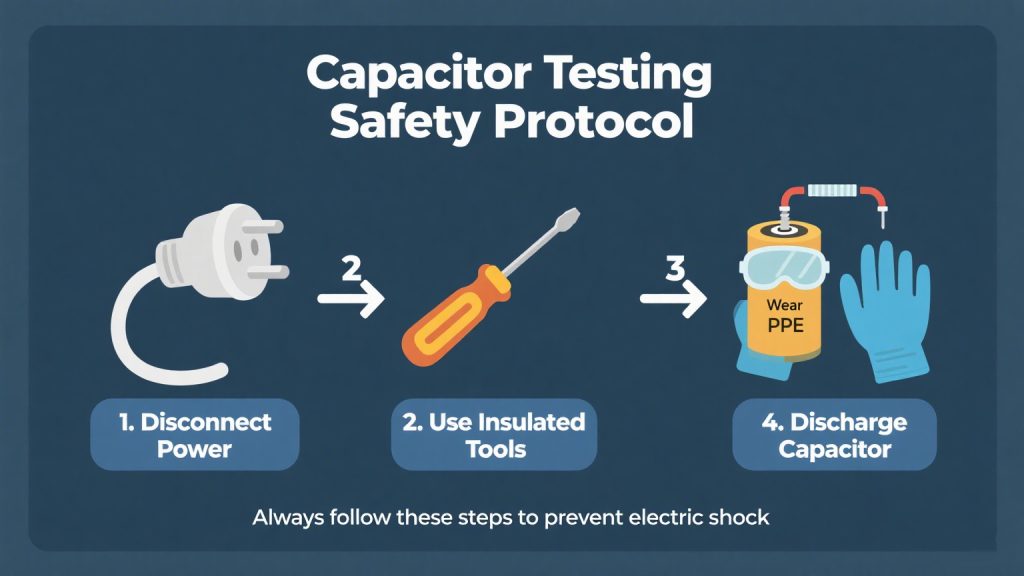
Before you start, ensure the power source is disconnected. This step eliminates the risk of electrical shock. Always use insulated tools to avoid accidental short circuits.
It’s crucial to wear protective gear. Gloves and safety goggles can protect you from potential hazards. Follow these precautions to safeguard yourself:
- Disconnect power
- Use insulated tools
- Wear gloves
- Use safety goggles
By taking these safety measures, you reduce the risk of injury. Safety is a priority when handling electronic components. Protecting yourself ensures a safer testing process.
Tools You Need to Test a Capacitor
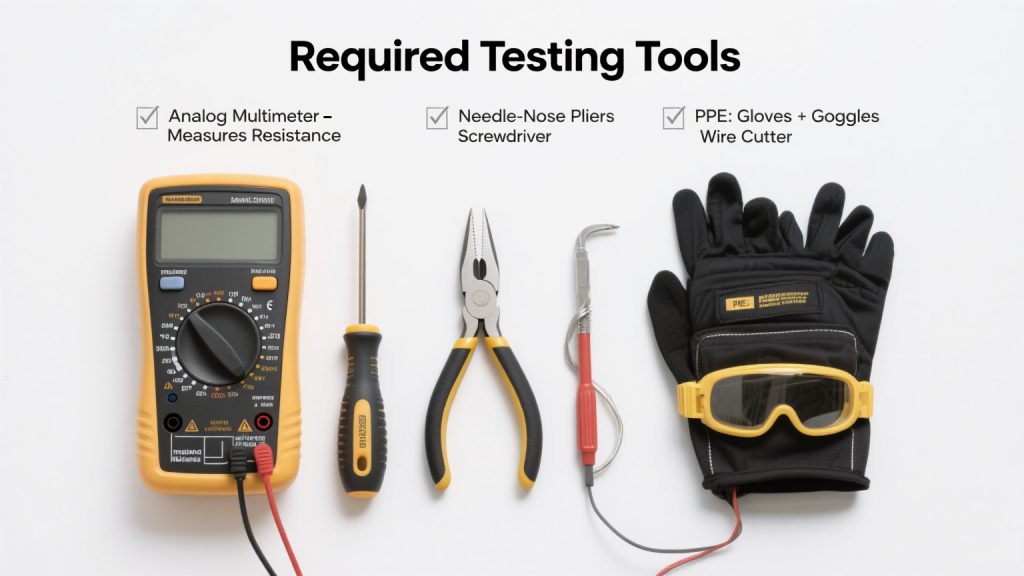
Testing capacitors requires specific tools for accurate results. Essential tools ensure a smooth testing process. An analog multimeter or ohmmeter is necessary for checking capacitors.
Basic hand tools are also useful. Ensure you have screwdrivers, pliers, and a wire cutter available.
Here’s a list of required tools:
- Analog multimeter or ohmmeter
- Insulated screwdriver
- Pliers
- Wire cutter
- Safety equipment
Having these tools will facilitate the testing process. They help you diagnose and address capacitor-related issues efficiently. Proper tools make testing safe and effective.
How to Discharge a Capacitor Safely
Discharging a capacitor is crucial before testing. It prevents electric shock, ensuring safety. Always handle capacitors with care to avoid hazards.
Begin by disconnecting the capacitor from any power source. Use a resistor with appropriate resistance to discharge slowly.
Follow these steps for safe discharge:
- Disconnect the capacitor
- Use a resistor to discharge
- Wait for the capacitor to drain completely
By discharging capacitors safely, you protect yourself from potential harm. Proper technique reduces risks during testing. Always prioritize safety when working with capacitors.
Visual Inspection: The First Step in Checking a Capacitor
Begin diagnosing capacitor issues with a careful visual inspection. It can reveal visible signs of damage quickly. Look for physical clues to assess the capacitor’s health.
Here are common signs of a problematic capacitor during a visual check:
- Bulging or swelling
- Leaking electrolyte
- Burn marks or a burnt smell
Visually inspecting capacitors is crucial as it highlights obvious problems. Spotting damages like leaks or bulges usually indicates a faulty capacitor. This initial step is simple but essential. It sets the groundwork for further testing.
Taking the time for a thorough visual examination can save effort later. It helps decide if further testing is necessary or if replacement is needed.
How to Test a Capacitor with an Analog Multimeter
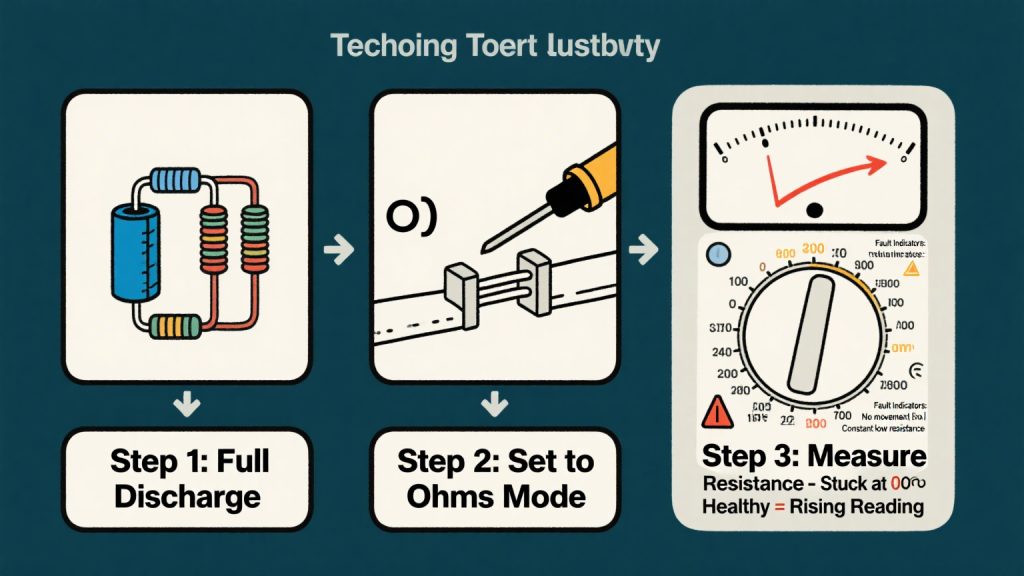
Testing a capacitor with an analog multimeter is a straightforward process. First, ensure the capacitor is fully discharged to prevent shock. Safety is crucial when working with electronic components.
Set the multimeter to its ohm setting. This allows the meter to measure resistance, which is key in determining a capacitor’s condition.
Attach the multimeter probes to the capacitor’s terminals. Use the red probe on the positive terminal and the black probe on the negative terminal. Proper connection is essential for accurate readings.
Initially, the multimeter should show a low resistance value. This is because the capacitor is charging through the multimeter. A gradual increase in resistance indicates a healthy capacitor. The needle should steadily move towards infinity.
Signs of a faulty capacitor include:
- Resistance not changing
- Stuck at zero
- No movement on the scale
Testing capacitors with an analog multimeter is effective and reliable. Note the initial low resistance followed by a rise towards infinity. This pattern signifies a functioning capacitor.
If the multimeter’s needle doesn’t move, the capacitor may be defective. Either it’s open, or it’s shorted, thus necessitating further action. Always refer to the manufacturer’s specifications for accurate interpretation.
Testing a Capacitor with an Ohmmeter
Testing a capacitor with an ohmmeter is a quick way to verify its functionality. Before starting, ensure the capacitor is safely discharged. This precaution prevents accidental shock and damage to the device.
Begin by setting the ohmmeter to measure resistance. This setting is often marked by the omega (Ω) symbol. Understanding your ohmmeter’s settings is crucial for accurate results.
Connect the ohmmeter’s probes to the capacitor’s terminals. The polarity usually does not matter, but check if it is a polarized capacitor. Observe the meter’s display closely.
A good capacitor will show an initial low resistance. This is followed by a gradual increase as the capacitor charges. The reading should eventually move towards a high resistance value.
Indications of a bad capacitor include:
- The resistance remains low or zero.
- The needle does not move.
- The reading stays constant.
Using an ohmmeter can reveal important information about a capacitor’s health. Regularly test capacitors to ensure optimal performance in electronic circuits. This habit can prevent unexpected failures and prolong device lifespan.
How to Test a Start Capacitor with a Multimeter
Testing a start capacitor with a multimeter is essential for ensuring your motor starts efficiently. Begin by disconnecting the capacitor from the power supply. Always discharge it completely to avoid hazards.
Set the multimeter to the capacitance measurement mode. This setting is typically marked by a capacitor symbol. Make sure your multimeter supports this function.
Attach the multimeter probes to the capacitor terminals. Polarity is usually important for electrolytic capacitors, so observe the markings. Watch the display for a capacitance reading.
Compare the reading to the capacitor’s rated value, printed on its casing. If the observed value deviates significantly, the capacitor is likely faulty.
Indicators of a failing start capacitor include:
- A reading far lower than specified.
- No capacitance reading at all.
By performing this test, you can pinpoint start-up issues in motors and ensure reliable operation. Regular checks help maintain performance and prevent costly breakdowns.
Capacitor Continuity Test: Checking for Shorts and Opens
Continuity tests help detect shorts and opens in capacitors. It ensures the capacitor’s internal circuit is functioning. Start by setting your multimeter to the continuity mode.
Next, connect the multimeter probes to the capacitor terminals. You’ll hear a beep if there’s a short circuit. A constant beep or zero resistance indicates a shorted capacitor.
Look for the following during the test:
- No beep means an open circuit.
- Beep with low resistance indicates a short.
This test helps identify critical issues, preventing further damage to electronic devices. Regularly conducting continuity tests ensures the reliability of your electronics.
How to Interpret Test Results: Good vs. Bad Capacitors
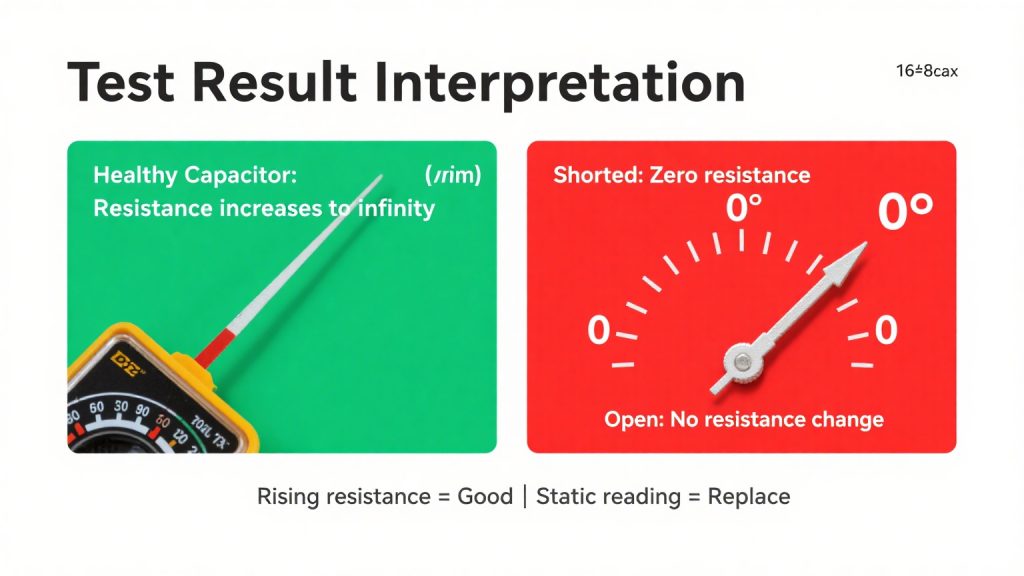
Interpreting test results is crucial for diagnosing capacitors. A good capacitor will exhibit specific behaviors during testing. When measuring resistance, expect a gradual increase in resistance on the multimeter. This increasing resistance shows the capacitor is charging.
Conversely, a constant or very low resistance suggests a bad capacitor. If the resistance remains unchanged, there might be a fault. High resistance readings can also indicate an open circuit within the capacitor.
Key points to consider include:
- Gradual resistance increase: Good
- Constant reading: Potential fault
- No change: Bad or open
Understanding these test results will guide you in making informed repair or replacement decisions. Accurate interpretation is essential for maintaining effective electronic circuits.
Types of Capacitors and Their Testing Methods
Capacitors come in various types, each with distinct properties. Common types include electrolytic, ceramic, and film capacitors. Each type has specific testing methods suited to its characteristics. Knowing the type helps in selecting the right testing approach.
Electrolytic capacitors often require ESR (Equivalent Series Resistance) checks. An analog multimeter can measure their resistance values effectively. Ceramic capacitors, smaller in size, are best tested for continuity and capacitance value. Film capacitors, known for stability, should be checked for capacitance discrepancies.
Here’s a quick guide to testing methods:
- Electrolytic: Check ESR and capacitance
- Ceramic: Test for continuity and capacitance
- Film: Verify capacitance readings
Understanding these testing methods is important for accurate diagnostics. Each type plays a unique role in electronic circuits, requiring a tailored testing approach.
Where Can You Buy Capacitors? Sourcing Replacements
Finding reliable sources for capacitors is essential for any electronics project. Many options are available for purchasing capacitors, each catering to different needs. Whether you’re a hobbyist or professional, choosing the right supplier is crucial.
Consider these options when purchasing capacitors:
- Local Electronics Stores: Convenient for quick purchases.
- Online Retailers: Offer a wide range with reviews.
- Specialty Suppliers: Provide bulk options for professionals.
Each source offers unique benefits, from immediate availability to extensive variety. Evaluate your specific needs to choose the best option for your capacitor requirements.
Components of Electronic Devices: Capacitors and More
Electronic devices rely on a range of essential components. Capacitors, resistors, and diodes work together to ensure functionality. Each plays a distinct role, contributing to the device’s overall performance.
Here are key components you might find:
- Capacitors: Store and release electrical energy.
- Resistors: Control current flow in a circuit.
- Diodes: Allow current to pass in one direction.
Understanding these components is crucial for anyone interested in electronics. Their interaction is vital for building and repairing electronic circuits effectively.
List of Common Electronic Components with Pictures and Symbols
Knowing electronic components is essential for any electronics enthusiast. Each component has a unique function, symbol, and importance in a circuit. Familiarize yourself with these to ease troubleshooting and design tasks.
Some frequently used components include:
- Transistor: Amplifies or switches electronic signals.
- LED: Emits light when current passes through.
- Integrated Circuit (IC): Complex circuits in a single chip.
Recognizing these components, along with their symbols, helps in reading schematics. This knowledge is a foundation for any electronics project, leading to successful circuit development.
Frequently Asked Questions About Testing Capacitors
Testing capacitors can raise many questions. Here are answers to some of the most common queries about this topic.
What tools are needed to test capacitors?
At a minimum, you’ll need a multimeter or an ohmmeter. These tools help measure capacitance and detect faults.
How do I handle capacitors safely?
Always ensure the capacitor is discharged before testing. Use insulated tools and take extra care to avoid electric shock.
Here’s a quick list of FAQs for easy reference:
- What indicates a bad capacitor?
- Can I test a capacitor without removing it from the circuit?
- What causes capacitors to fail?
Understanding these questions improves testing practices and ensures safe handling of capacitors.
Conclusion
Regular testing of capacitors is crucial for maintaining the health of electronic devices. Faulty capacitors can lead to device failure or unpredictable behavior. By identifying bad capacitors early, you can prevent bigger problems down the line.
Testing also prolongs the lifespan of your electronics, saving you time and money. Adopt a routine to inspect capacitors and enjoy more reliable performance from your gadgets and appliances.
SHARE: